by colpar0 | Aug 15, 2020 |
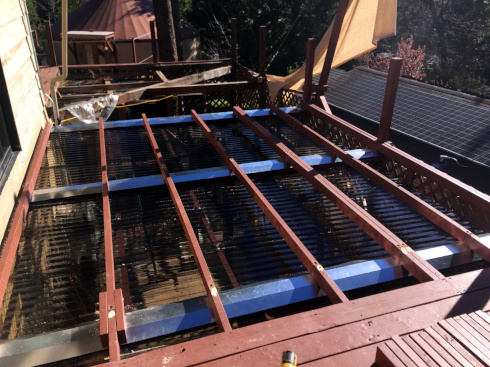
In late 2019 we began the largest project yet at P&P, even bigger than building the yurt! For 50 years the redwood and cedar deck around the house had been serving the owners, relatively untouched, but now it was starting to rot and a major overhaul was needed. With the help of Kevin Turner, Prasad Peebles and Josh Phillips, we put in over 1500 hours and $20,000 to restore the deck to an optimal state. We re-used old redwood boards where possible to conserve resources. As part of the effort we installed polycarbonate panels underneath the front deck area to prepare for the dormitories, which would be 3-season accommodations underneath the deck. We finished the work in August of 2020. We started with the front stairs. In this photo you can really see the rotten joists underneath the planks. Most of the planks had rot as well. During the renovations the yard was turned into a full-on work zone with piles of lumber all over the place. We worked in sections, finishing one section before moving onto the next. The gap in between where there were no planks was always a hazard. Here are some freshly painted planks ready to be installed. Some of them are originals that have been planed and sanded and some are brand new lumber. Here you can see the polycarbonate panels and galvanized flashing that was installed to create a dry space underneath the deck for the future 3-season dorms. Continuing around the corner toward the rainbow: Here’s a photo taken the following year showing the completed deck on this side of...
by colpar0 | Aug 7, 2020 |
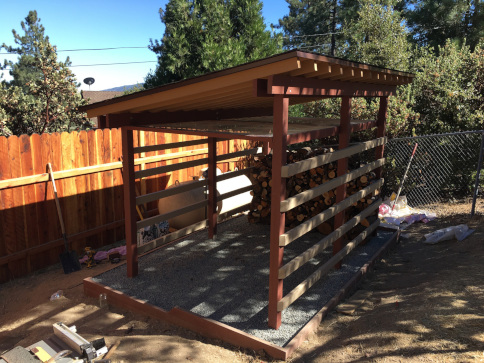
As we worked on the deck renovations and decided to put the dorms in under the deck, we realized that the place we were storing our tools and wood would no longer exist and a new place was needed. So we decided to build a wood/tool shed over the area where we installed the new leach field, behind the house and out of the way. In addition, since we had removed the chain link fence when we installed the leach field, it was time for a new fence to go in. We build the fence first and in the exact same style as the main fence around the lower property. Here’s a photo after the fence is complete (but without lights on the posts) and the wood shed is being built: Here is the shed completed with the wood moved into it. You can see the shelf up top where we are planning to store our landscaping tools. There is also gravel on the ground inside the foundation: This photo was taken a few months later after all of the scrap from the deck renovations was added to the wood shed. We’ll have enough wood for several winters...
by colpar0 | Jul 28, 2020 |
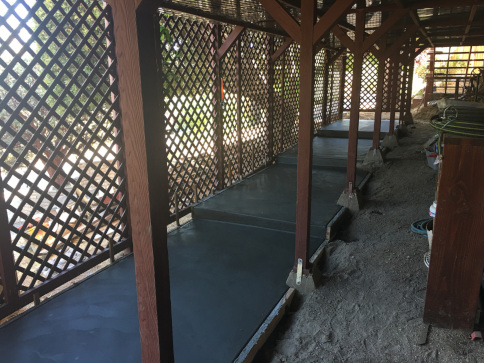
As we worked on the deck renovations in 2020 we realized that an ideal use of the new dry space under the deck would be more spaces for guests. This led to the 3-season “dorms” idea. To start this off, we had a local contractor, Pumper Jim, do a professional install of a multi-tier concrete slab. He was the same person who did our driveway for the P&P entrance and he did a great job here as well: Freshly poured...
by colpar0 | Dec 7, 2019 |
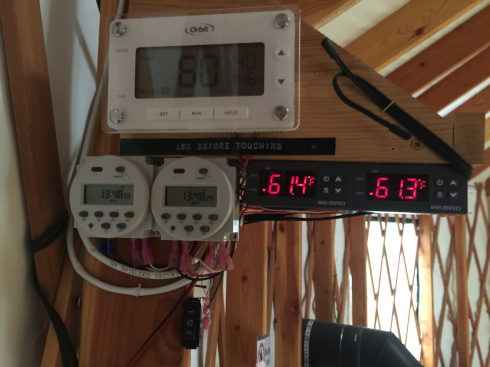
In the winter of 2018-2019 we experienced numerous cases of heating issues in the yurt. The propane heater either wasn’t producing enough heat or it was not turning on at the proper time. To resolve these issues we decided to install a redundant thermostat system and a 240v electric heater. Although the heater was remarkably inexpensive, there were some challenges, including having to run a new 240v electric line to the yurt and figure out a way to tie the heater in to the existing thermostat. Here’s a photo of the new redundant thermostat/timer setup: Here’s the heater we decided to go with, which cost less than $200 on Amazon, amazingly: To solve the issue of tying the heater into the thermostat Colin came up with a smart hack. The temperature sensor in the heater is a thermistor, which is a resistor that changes resistance at different temperatures. So by hacking into the thermistor circuit and redirecting it to a logic board switch that could route the current through two different resistors of known resistance, we are able to make the heater think it’s either 32 or 99 degrees in the yurt, thereby forcing it to turn on or off. Here’s the completed hack with the relay (switch) on the left and the resistor circuit on the right. We have had much better success with heating the yurt, and for less money, ever since!...

by colpar0 | Sep 25, 2019 |
For some time we had been wanting to put a railing around the yurt deck and add some shade, and this was the perfect time to do it. The railing matches the color scheme of the house’s deck and the shade fabric follows the same color scheme as the rest of the property as well. We added four posts to the corners of the deck to support everything: Here’s a picture of the work completed with the shade fabric...

Recent Comments